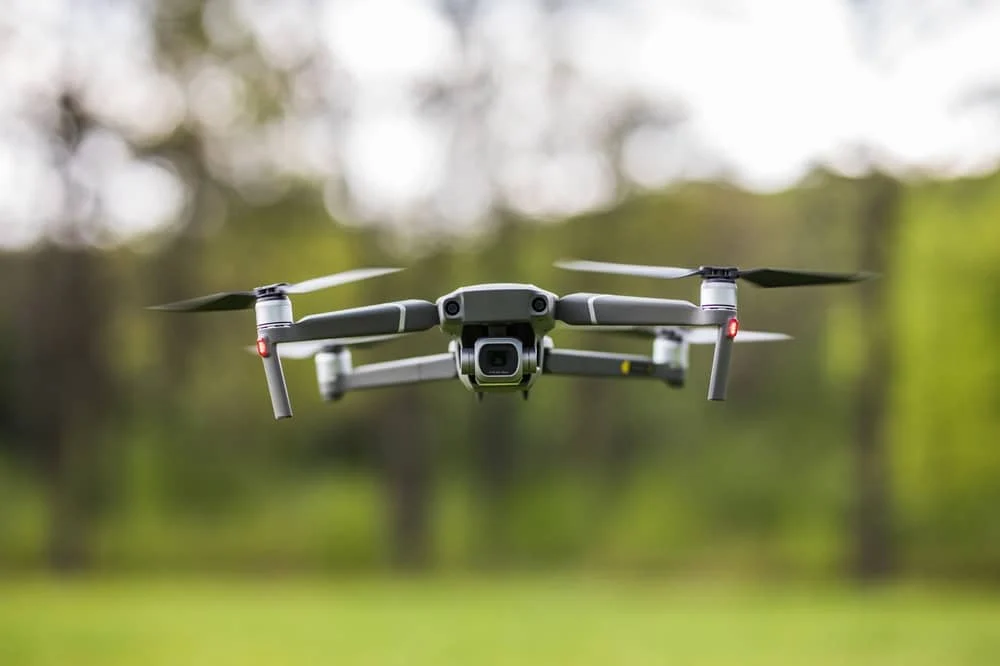
The world from above offers a breathtaking perspective, and thanks to modern drone technology, capturing stunning aerial photography and videography is more accessible than ever. What once required expensive equipment and specialized skills can now be achieved with user-friendly, feature-packed drones perfect for beginners. If you’re looking to elevate your photography game and explore new digital worlds from the sky, getting started with a drone is an incredibly rewarding experience.
Why Start with a Beginner Drone?
For aspiring aerial photographers, starting with a drone designed for beginners is crucial. These models prioritize:
- Ease of Use: Simple controls, intelligent flight modes, and often robust build quality make learning to fly less intimidating.
- Safety Features: Many beginner drones include GPS stabilization, obstacle avoidance, and “Return to Home” functions, significantly reducing the risk of crashes.
- Portability: Often compact and lightweight, they are easy to transport to your desired shooting locations.
- Cost-Effectiveness: They allow you to learn the ropes without a significant financial investment, before potentially upgrading to more advanced models.
Key Features to Look for in Your First Drone
When choosing your beginner drone for aerial photography, consider these essential features:
- Camera Quality: Look for at least 1080p video resolution, with 4K being ideal for sharper images and more detail. A stable gimbal (a motorized camera mount) is vital for smooth, cinematic footage, even if the drone moves.
- Flight Time: Aim for at least 20-30 minutes of flight time per battery to give you ample time for flying, composing shots, and learning.
- GPS & Stabilization: GPS ensures the drone can hover steadily in one place, even in light winds, making it easier to frame your shots. Altitude hold is another great feature for maintaining a consistent height.
- Ease of Control: Features like “one-touch take-off/landing,” “headless mode” (which simplifies orientation), and “Return to Home” (RTH) are invaluable for new pilots.
- Obstacle Avoidance: While more common on mid-range drones, some beginner models offer basic obstacle sensors that can help prevent collisions.
- Portability: A foldable design makes it easy to pack and carry your drone to various locations.
- Weight (Under 250g): Drones under 250 grams (like many DJI Mini series drones) often have fewer regulatory requirements in many regions, which can simplify the starting process. (Please note: Always check the latest drone regulations in Kenya from the Kenya Civil Aviation Authority (KCAA) as rules can change.)
Understanding Basic Drone Flight Controls
Most drones are controlled using a remote controller with two joysticks, typically following “Mode 2” layout:
- Left Stick:
- Up/Down (Throttle): Controls the drone’s altitude. Push up to ascend, pull down to descend.
- Left/Right (Yaw): Rotates the drone horizontally (spins it left or right on its axis).
- Right Stick:
- Up/Down (Pitch): Tilts the drone forward or backward, controlling forward or backward movement.
- Left/Right (Roll): Tilts the drone left or right, controlling sideways movement.
Practice these movements in a safe, open space to build muscle memory before attempting complex shots.
Essential Tips for Beginner Drone Photographers
- Know the Regulations: Before your first flight, familiarize yourself with drone laws in Kenya. This includes registration requirements (often mandatory for drones with cameras), no-fly zones (around airports, government buildings), maximum altitude limits, and rules regarding flying over people or private property. The Kenya Civil Aviation Authority (KCAA) is your go-to source for official information.
- Start in Open Spaces: Choose a large, clear area away from trees, power lines, buildings, and people for your initial flights.
- Check Weather Conditions: Avoid flying in strong winds, rain, or fog. Wind can make control difficult and drain battery quickly.
- Pre-Flight Checklist: Always check battery levels (drone and controller), propeller condition, and GPS signal before every flight.
- Practice Basic Maneuvers: Master hovering, smooth take-offs and landings, and gentle turns before trying more ambitious shots.
- Shoot in RAW (if available): If your drone camera supports RAW format, use it. This gives you much more flexibility for editing photos later, especially for correcting exposure and color.
- Composition is Key: Apply basic photography composition rules (Rule of Thirds, leading lines, symmetry) to your aerial shots. Look for interesting patterns and perspectives that are only visible from above.
- Understand Camera Settings: Get familiar with your drone camera’s settings like ISO, shutter speed, and white balance. While auto mode is fine for beginners, learning manual control will unlock your creative potential.
- Post-Processing: Use photo editing software (like Adobe Lightroom or free alternatives) to enhance your aerial images. Adjust brightness, contrast, color, and sharpen details.
- Be Patient and Persistent: Flying a drone and mastering aerial photography takes practice. Don’t be discouraged by initial challenges; every flight is a learning opportunity.
Drones offer a thrilling new dimension to photography and videography. With the right beginner drone and a commitment to learning, you’ll soon be capturing stunning perspectives that were once only a dream.
At Electronics Place, we offer a wide selection of beginner-friendly drones equipped with excellent cameras, intuitive controls, and robust safety features to help you embark on your aerial photography journey. Visit us today to find the perfect drone to start exploring new digital worlds from the sky!


 No products in the cart.